Friday, January 15, 2010

Publish Blog through Email


Sometimes, you may not get a chance to go to blogger and publish a blog. Or quite possible you get something interesting in your inbox and want to publish it to your blog.
Post can be published in Blogspot by just sending email.

Here is the solution. You can change some settings and directly publish your post by sending email.

Step1:- Go to Settings  --> Email & Mobile


Step2:- There you will find  Posting Options as shown in this image.


You need to chose a secrete word here, which will be a part of email id used for publishing. You can chose options of immediate publish or save it as draft post.

That is it. After setting up this post option from email, you can mail whatever you want to publish to this id. Based on the option selected by you, that post will be published immediately or it will be saved in draft so that you can further modify it and publish.

Blogger Tips and Tricks:-
Unless you are not quite very sure, don't publish this secret email id anywhere. Anyone can send mail to that mail id and it will be really tough to manage the blog then.

Thursday, January 14, 2010

Remove date from Blogspot Post


By default, your blogspot post contains published date based on Date Header Format chosen by you. In this post, we will discuss how to remove date from blogspot.

Step1:- Go to Layout --> Page Element
Here you will find Edit for Edit for Blog Post section as shown in this image.


Step2:- Click Edit and then uncheck 1st Post Page Options, as shown in image.


Thats it. Publish date has been removed from blogspot post.


Change URL of Blog - Blogspot


You want to change URL of your blog in blogspot? Yes, its absolutely possible (subject to availability).

I will take example of my blog. URL for this blog is diy-blogspot.blogspot.com. I want to change the url to diy-blogspot123.blogspot.com.
How to do it?

Step1:- Go to Settings - Publishing. Here you will find Blog*Spot Address and your blog url will be shown in an editable input box.
Input your desired blog url (for testing, I've given diy-blogspot123.blogspot.com)


Step2:- After chosing new blog url, click on SAVE SETTINGS. If the url chosen by you already exists, there will be an error "Sorry, this blog address is not available", else in case of availability of that particular url, you will be able to save it successfully.

Now your old url will not be availabe. In place of that old blog url, new url will start working.
Old URL


New URL


Blogger Tips and Tricks
In normal scenario, avoid changing the URL of your blog.
There may be several inbound weblinks, which will point to your blog url. When you change the URL, Blogspot does not redirect the trafic from old url to your new url. It will simply give error "The blog you were looking for was not found", if someone tries to go to old blog url.
And you will lose many of your visitors!!

Wednesday, January 13, 2010

How to delete a blog permanently?


I will keep this post very short, as I would never want you to delete your blog. However if you are in need of deleting your blog permanently, here are the steps:-
(for testing, I created a blog test-for-permanent-delete.blogspot.com)

Step1:- Go to Settings - Basics
Here you will find Delete blog option, as indicated in this image. Click on Delete blog.


Step2:- Google will ask for your confirmation. Click on DELETE THIS BLOG.


Your blog is deleted now. If you try to browse your blog, you will have an error "The blog you were looking for was not found."


Blogger Tips and Tricks:-
Before delete your blog permanently, it would be safe to take export of your full blog. This full export will contain all the posts as well as comments also.

Saturday, January 2, 2010

Create a website using Blogspot


Have you noticed that look and feel of several Blogspot blogs appear to be more similar of a website rather than a blog. Have a look at this blog - http://babadhaminfo.blogspot.com

Why it looks like a website?
This blog is having a static home.
As we know, Blogspot places your postings in a chronological order, we can create a sticky post and set its publish date in future. Till that that, it will appear in the top. I generally put this publish date as '1-Jan-2099'.

Here are the steps to create such a blog (which appears to be a website).

Step1:- Remove Navbar
Follow this link Remove Navbar in order to get this done.

Step2:- Create a sticky post
In one of the post, I have already discussed it. Please go to Sticky Post in Blogspot for more details.

Create this sticky post, which can serve to give a welcome note to your blog-cum-website. Else give an introduction to your website in this future dated posting.

Blogger Tips and Tricks :- Everytime you Edit/Modify this sticky post, double-check the Posting date. If its gone missing as a sticky post, re-enter the publish date and publish it again.

Step3:- Configure Blog post. You need to remove date, posted by, comments, lables etc from the configuration. If you like, you can maintain to have a comment option in your blog-cum-website page. Follow these sub-steps to get this done.

Step3a:- Edit blog post.


Step3b:-
(a) Set 'Number of posts on main page = 1
(b) uncheck rest of the options depending upon your preference.


Step4:- Create rest of the pages of blog-cum-website
Assume, you want to create a disclaimer page. Go to 'New Post' and create a posting on 'Disclaimer' as normally as you do.
Don't change it 'Post date and time' and let it be published 'Automatic'.

Blogger Tips and Tricks :-At first, publish the post with Suitable Title, say 'Disclaimer'. Edit it again and then remove this title and republish your post. By doing this, you will have a seo-friendly url which will help your visitor to find this page in search engines.

Once you publish this post, it won't appear on your blog because you have already selected 'Number of posts on main page = 1 and this published post on main page will be your sticky post which you have created in Step2.

After you publish this Disclaimer post, you will have a confirmation message "Your blog post published successfully!". Below that, you can find a link of "View Post".


Open it in a new window and copy the url of this post. Say, the url for disclaimer page is:- http://babadhaminfo.blogspot.com/2010/01/disclaimer.html

Step4:-
Now you need to create a menu bar (either horizontal or verticle) for your blog navigation. Follow these sub-steps for that.

Step4a:-
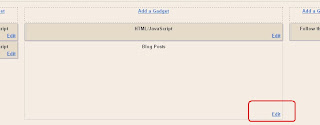
In the layout, select 'Add a Gadget' on Sidebar or on Main-wrapper, depending upon your choice.

Step4b:-
Select "HTML/JavaScript" (you can also select "Text"), and add a Clickable link which will point to your Disclaimer post.
<a href="http://babadhaminfo.blogspot.com/2010/01/disclaimer.html">Disclaimer</a>

Step5:-
You are almost done with the blog-cum-website, except few small issues. Here we discuss in sub-steps:-

Step5a:-
Remove Newer Post | Home | Older Post links, which appears just below the published post. Please follow this link, Remove Newer Post | Home | Older Post to get this done.


Your Blog-cum-website is now ready. Decorate it with useful information and let the world know about you blog.

Happy Blogging.
BlueOcean


Popular Posts

Popular Posts On EAB

Demo Donation
This demonstration will accept a fixed amount of $0.05.

Man Behind This Blog

My Blogs